
Material functions in Unreal Engine sound scary, and I remember I was avoiding them as they sounded more like something programmer would use. None of my concern.. I thought. Well, I was wrong. These are super easy to create and use.
The concept of a material function is very simple. They are like a containers or building blocks that have outputs and sometimes inputs as well.

You can create Material Function by right clicking empty area in content browser and diving to Materials & Textures. Choose Material Function.
What you can see is a lonely Output Result node. Let’s build something.

Let’s say that we want to create reusable roughness adjusting function. This is just a very simple example, but you can see how this technique could be used to make very advanced adjustable materials.
Lets start by making a scalar input to this. Right click on canvas and type “input” and choose Function Input. By default it is Vector3 but we only a single value, so choose Function Input Scalar from the left side Input Type. If you want to create material functions dealing with RGB color, choose 3 way vector for that.

Lets call this RoughnessInput. You can name it as you like in the Input Name.
Next press M on keyboard and left click on empty area of the canvas this will create Multiply node. Connect a line from the newly created RoughnessInput to the A input of the Multiply. Right click on B and select “Promote to a parameter”.

Let’s name this parameter RoughnessStrength and give it a default value of 0.5. We are almost done.
Just drag a line from Multiply to the Output Result node. Our Material Function is now complete.
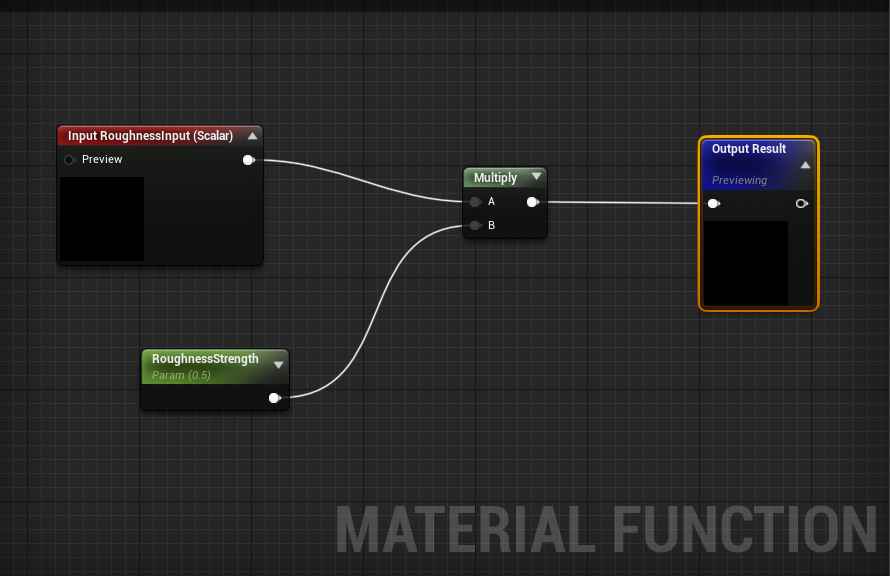
It will accept Roughness (well actually any scalar value) as input and we have created a parameter that multiplies the input. Actually any parameters or switches we create along the way can be adjusted in resulting child materials. Let’s test it.

Here I have a lovely pink material. Its very simple, just color and .5 roughness value. Let’s drag and drop the function we created and connect it as follows.
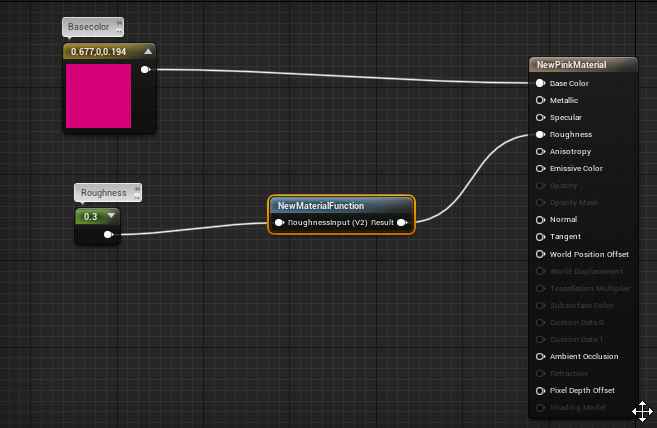
Now we have this. In order to see and adjust the param, let’s create material instance of this material by right clicking the material in the content browser.

Now we have a new Global Scalar Parameter in the material instance that controls the roughness strength.

Of course, this is more handy when dealing with more complex materials.
I have created a special FoliageSet function that contains several aspects of entire foliage material, including wind effect. This was then fed to a master material, from which all foliage material instances in a level were created. This means I had to do this work only once, and now there can be several hundred different foliage assets that get their values from this one.

This is what the FoliageSet function contains:

It’s messy, I should have tidied it up a bit more, still way better than having all of this in every single material. I bet this is faster too. So let’s take a closer look.

For example the T_Basecolor is a texture parameter, in other words empty slot which shows up in the final Material Instances. So what we are making here is a template for the assets. Parameters we define in material functions will show up in Material Instances that are derived from the master materials.
Here is other example.

This is a world position offset style wind effect that is cheap to calculate. You can see that this refers to F_TreeWind material function, sets several parameters and a Switch Param and finally feeds into output that is called OutputWPO. So the material functions can have a hierarchy and can be built from blocks like this. This really helps in organization and the right mindset of creating materials modularly.
Please also check adjusting normal map strength tip I posted earlier.


Trackbacks & Pingbacks
[…] you are new to material editor in Unreal check out this small tutorial on using material functions. It is easy and […]
Comments are closed.